Home Tree Atlas

Attic Rooms – 11 Different Conversion Ideas

Attic Rooms - 11 Different Conversion Ideas

I think the most creative idea has got to be the climbing gym. But a nice attic library and reading nook would be a good place to spend the day. Here are 9 ideas on how to use an attic space.

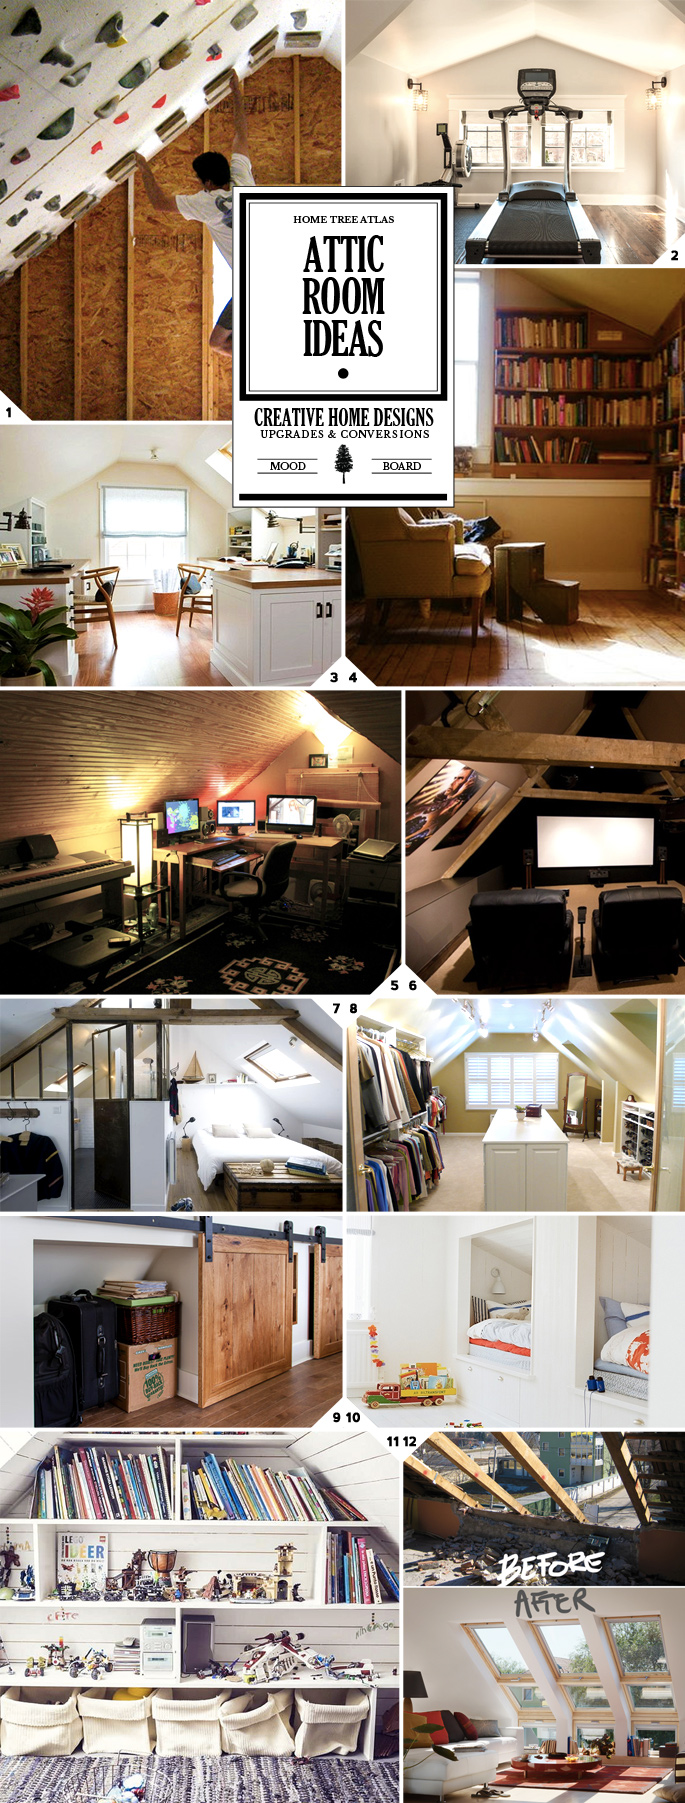
1. A Space to Workout

Attic Rooms - 11 Different Conversion Ideas: #1 A Space to Workout

Attic Rooms - 11 Different Conversion Ideas: #1 A Space to Workout

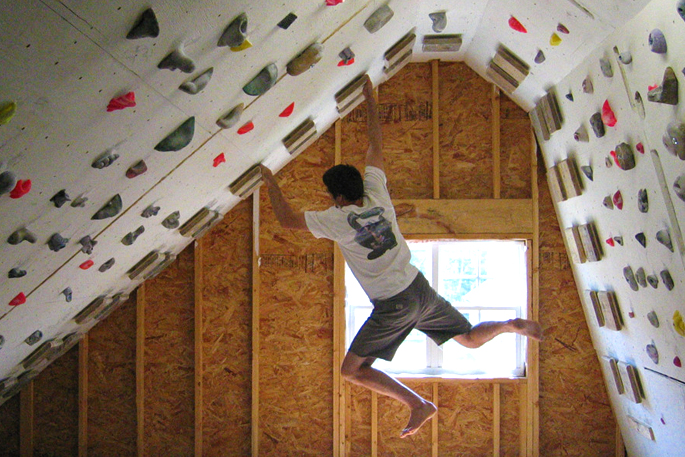
The slanted walls of the attic make for a good climbing space build. Even basic gym equipment, or a yoga mat, can turn an attic space into a home gym. And you’ll probably have space left over to add another one of the ideas below to your attic conversion.

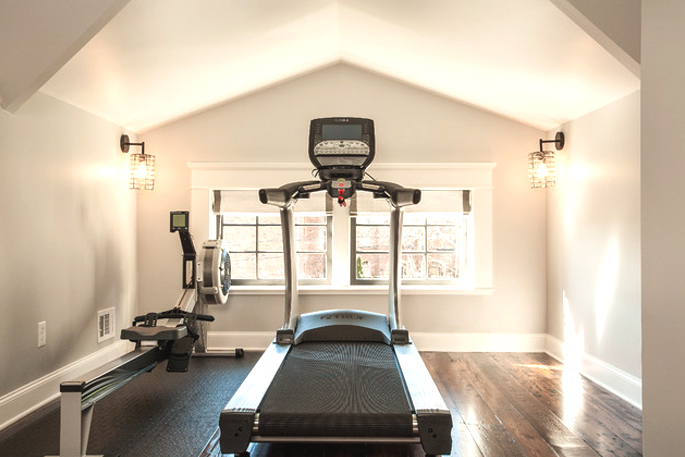
2. A Quiet Place to Work

Attic Rooms - 11 Different Conversion Ideas: #2 A Quiet Place to Work

It’s quite, and a little bit separated from the rest of the house – making the attic an ideal space for home office. And again, you’ll probably have space left over to include another idea from this post into your attic (such as #8 Adding Storage Space) .

3. Cocooned in Your Own Reading Nook and Library

Attic Rooms - 11 Different Conversion Ideas: #3 Cocooned in Your Own Reading Nook and Library

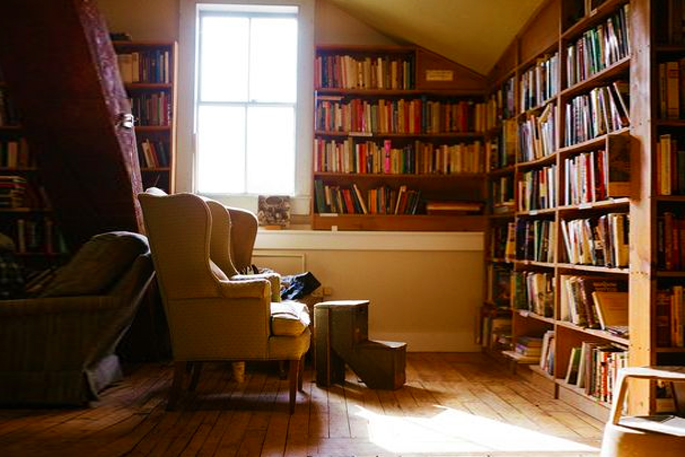
Fill up the walls with books, and the slanted walls will make you feel cocooned into your own reading nook and library. Don’t forget the window overlooking the garden, and comfy chairs.

4. The Cave – Attic Ideas for Men

Attic Rooms - 11 Different Conversion Ideas: #4 The Cave - Attic Ideas for Men

Go for a customized renovation of the attic and fill it up with all of your stuff. Whether that be a gaming computer, sports memorabilia, or a music room – have it all in one place in the house, separated from the rest. For more ideas on man caves, have a look at my post here.

5. A Space To Watch Movies

Attic Rooms - 11 Different Conversion Ideas: #5 A Space To Watch Movies

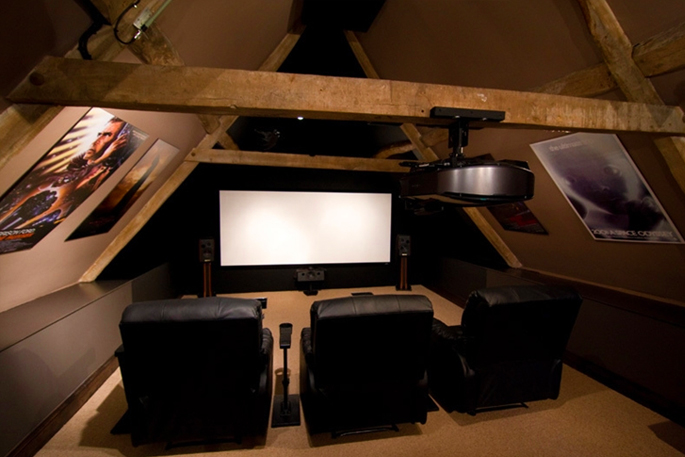
An attic will make for a very cozy home theater. It can be as simple as having a large TV, a comfy couch, and floor pillows. You could always add in a mini fridge, dimmable lights (or just have floor lamps behind the couch), and movie posters hanging from the walls.

6. All in One Bedroom Space

Attic Rooms - 11 Different Conversion Ideas: #6 All in One Bedroom Space

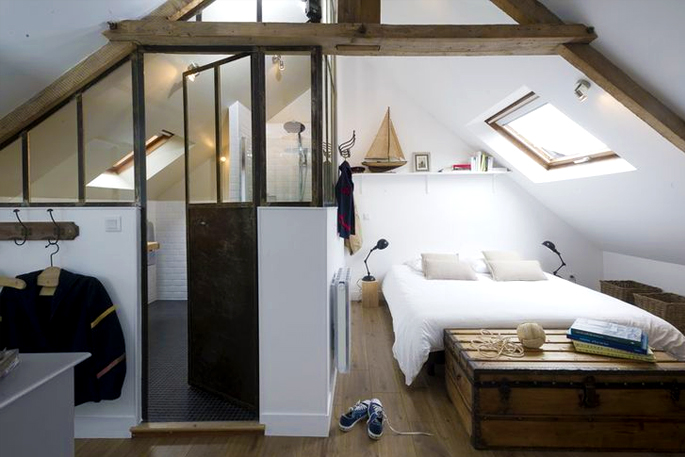
A lot of attics will have enough space to be converted into an ensuite bedroom. Saving the person from having to walk up and down the stairs. The finished attic bedroom could just be used as a guest bedroom that can also be a home office or gym when it is not in use.

Read my post here for more ideas on finishing and turning your attic into a bedroom.

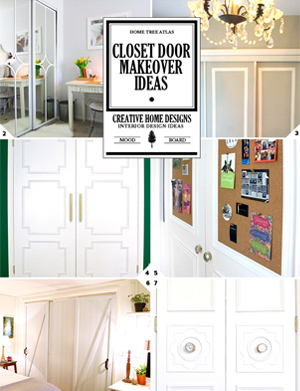
7. A Whole Room As A Walk In Closet

Attic Rooms - 11 Different Conversion Ideas: #7 A Whole Room As A Walk In Closet

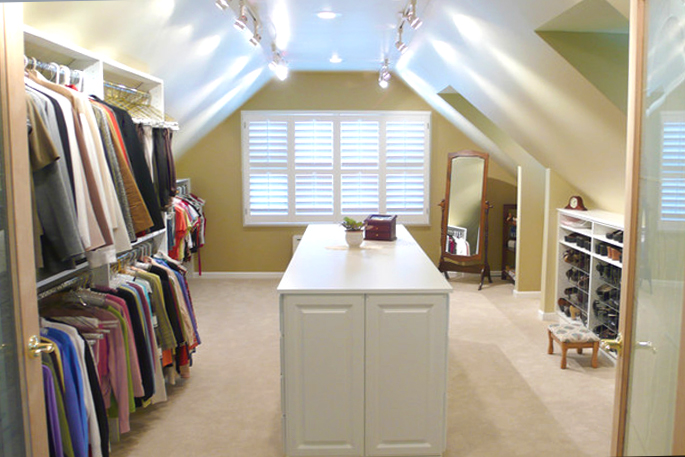
Building from the ground up means that you get to customize the storage space around the things that you want to keep up there. Some ideas include – an island (like a kitchen island), a bench to try on outfits, a floor mirror, and don’t forget about lighting (Closet Lighting Ideas: From Wireless to Walk In)

8. There is Never Enough Storage Space

Attic Rooms - 11 Different Conversion Ideas: #8 There is Never Enough Storage Space

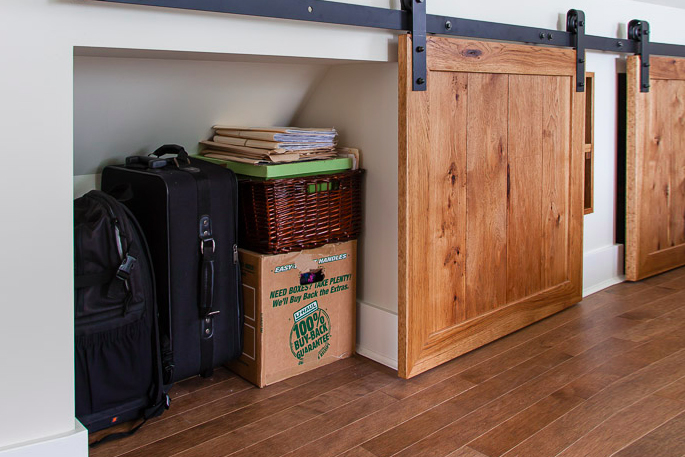
If you want to make the most of your attic space, then you’ll want to go with built in storage units. This is because you have those angled walls, and built in units can be built to fit into these spaces. For more ideas, designs, and pictures, on using your attic for storage, check out my post here: Finished and Unfinished Attic Storage Ideas.

9. The Kids are All Tucked Away

Attic Rooms - 11 Different Conversion Ideas: #9 The Kids are All Tucked Away

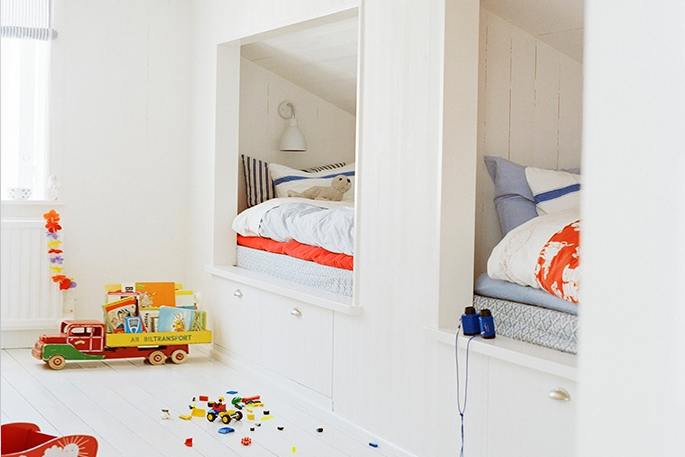
Built in bunk beds can be squeezed into the slopped walls, making for a cozy bed. For more ideas on creating a kids room, have a look at these mood boards:

10. A Room For the Kids

Attic Rooms - 11 Different Conversion Ideas: #10 A Room For the Kids

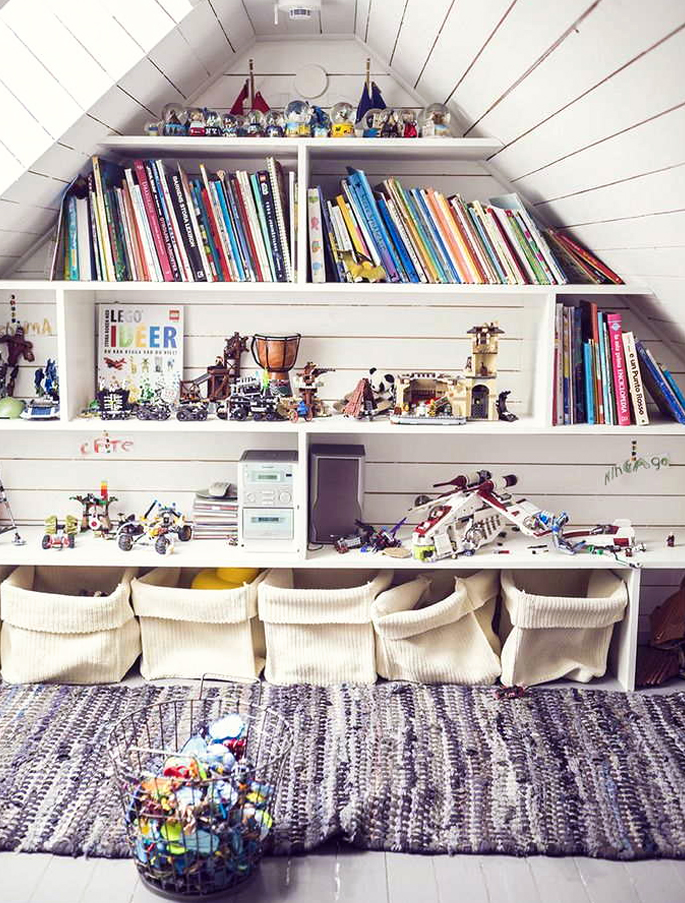
A finished attic can make for the perfect playroom space for the kids. Check out my basement playroom ideas post for design ideas on how to convert your attic into a playroom.

11. A Room With a View

Attic Rooms - 11 Different Conversion Ideas: #11 A Room With a View

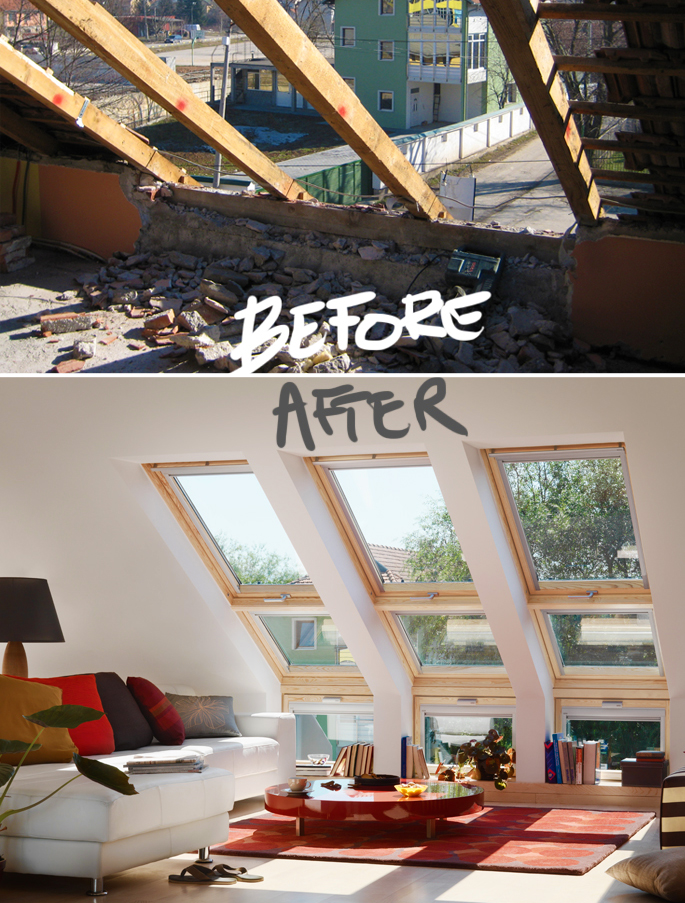
Why not renovate and makeover the attic with some large windows, and take advantage of the views waiting outside. You’ll have the perfect spot to watch the stars at night.

image credits: 1/2/3/4/5/6/7/8/9/10/11/12

More Attic Mood Board Posts:

February 7, 2016 in Attic, Construction

8 Emergency and Safety Items You Absolutely Need In Your Home

8 Emergency and Safety Items You Absolutely Need In Your Home

If an emergency does happens in your home, you don’t want to be wishing you had what you needed to solve it. Here are the top 8 emergency preparedness items to have in your home.

1. A Tool Kit, For Everyday Fixes and Disasters

8 Emergency and Safety Items You Absolutely Need In Your Home - #1 Emergency Tool Kit

A basic tool kit will be useful for minor home repair. Tools such as a wrench can also be used during natural disasters to turn off utilities. Here are some basic tools to include in your tool kit: screw drivers, a hammer, pliers, a wrench, and a box cutter. Just like this tool kit here.

2. The Multi Tool

8 Emergency and Safety Items You Absolutely Need In Your Home - #2 Multi Tool

A Swiss Army knife is another helpful tool that can get you out of small sticky situations. Buy yours here.

3. A Flash Light For Long Dark Spells

8 Emergency and Safety Items You Absolutely Need In Your Home - #3 Flash Light

Everyone has a phone with a flash light. But a battery powered flash light, kept near the bed, will be useful for long power outages, storms, and blizzards. The lantern in the picture above can be found here.

4. Copies of Personal Documents

8 Emergency and Safety Items You Absolutely Need In Your Home - #4 Personal Documents

This could include birth certificates, copies of passports, driving licenses, and bank details. Store these away from the originals.

5. Extra Cash

8 Emergency and Safety Items You Absolutely Need In Your Home - #5 Emergency Cash

Who knows when you’ll have an emergency and there is no time to hit the ATM

6. Smoke Alarms

8 Emergency and Safety Items You Absolutely Need In Your Home - #6 Smoke Alarms

Install a smoke alarm on every level of the house. One near the kitchen, and one near or in every bedroom. This alarm has both smoke and carbon monoxide detection.

7. Fire Extinguisher

8 Emergency and Safety Items You Absolutely Need In Your Home - #7 Fire Fire Extinguisher

Keep one of these in the kitchen, and make sure it is up-to-date. Also know the difference between a normal fire, grease fire and an electoral fire and how to put out each one. Here is a multi purpose fire extinguisher.

Fire Escape Plan – This is something to keep in mind. Figure out a home emergency plan. How will each person in each bedroom make it out of the house incase of a fire. Do all of the windows open? Is there a way out if the stairs are not passable?

8 First Aid Kits

8 Emergency and Safety Items You Absolutely Need In Your Home - #8 First Aid Kit

A first aid kit and supplies will come in handy for small cuts and grazes, but it will also help in controlling a major accident while help is on the way. 100 piece first aid kit

More posts:

February 7, 2016 in Safety

An IKEA Stool Turns Into a DIY Lamp and Tripod Stool Combo

An IKEA Stool Turns Into a DIY Lamp and Tripod Stool Combo

DIY IKEA FROSTA Lamp and Tripod Stool Combo

Home Tree Atlas DIY Projects

The curved leg of IKEA’s FROSTA stool looked like it could be turned into a stylish lamp. The good thing about this project is that you can rebuild the stool using the left over 3 legs – creating a tripod stool. And no tools are need to do all of this.

MATERIALS AND SUPPLIES

  • IKEA FROSTA Stool

I had one that was already being used as a stool

  • Concrete and Rubber Gloves

Premixed bags like Quikrete are easy to use since you just need to add water. But I used a bag of concrete and a bag of sand and made my own mix.

  • LED Lights and Superglue

I used some basic IKEA DIODER LED lights which I had

  • Paper, Cardboard, and Stanley Knife

This is to make the template and the box that will be used to pour the cement into

INSTRUCTIONS

STEP 1: Taking the stool apart

Since I’m using a FROSTA stool that I already had, I needed to take it apart

DIY IKEA FROSTA Lamp and Tripod Stool Combo - STEP 1 Taking it apart

DIY IKEA FROSTA Lamp and Tripod Stool Combo - STEP 1 Taking it apart

STEP 2: Making the template

The next step is to make a box for the cement. Draw a cross with 4 and 1/2 inch wide and tall panels. After cutting it out, trace it onto some thick cardboard.

I scored the insides of the box to make it easier to fold the sides.

DIY IKEA FROSTA Lamp and Tripod Stool Combo - STEP 2 Making the template

DIY IKEA FROSTA Lamp and Tripod Stool Combo - STEP 2 Making the template

DIY IKEA FROSTA Lamp and Tripod Stool Combo - STEP 2 Making the template

DIY IKEA FROSTA Lamp and Tripod Stool Combo - STEP 2 Making the template

STEP 3: Marking the base

When the cement is poured, you’ll want to have a bit of a base before putting in the wooden leg. So mark 1/2 inch on all sides of the box.

DIY IKEA FROSTA Lamp and Tripod Stool Combo - STEP 3 Marking the base

STEP 4: Waterproofing the cardboard and taping it together

Cover the inside of the template with tape to protect it from the wet cement. Then tape the sides together.

DIY IKEA FROSTA Lamp and Tripod Stool Combo - STEP 4 Waterproofing the cardboard

DIY IKEA FROSTA Lamp and Tripod Stool Combo - STEP 4 Taping the box together

STEP 5: Mixing the concrete

You’ll need some rubber gloves when mixing the concrete, as it can burn your skin. If you are using Quikrete, you’ll just need to follow the directions and mix it with water. I used the top of a cut off water bottle to mix 1 part concrete with 2 parts sand with enough water to get a wet mix.

DIY IKEA FROSTA Lamp and Tripod Stool Combo - STEP 5 Mixing the concrete

DIY IKEA FROSTA Lamp and Tripod Stool Combo - STEP 5 Mixing the concrete

STEP 6: Pouring the cement

Pour the cement until you reach the 1/2 mark. Then shake the box a bit to flatten out the cement. Now you can put the stool leg into the box, using books/scrap wood/paint tins/anything to hold up the leg at the right level.

As you pour the cement, use a thin stick to poke all the way around the box to help release the air bubbles. Tapping on the outside of the box lightly also helps release air bubbles.

I had to put some scrap wood onto of the stool leg to hold it down, as it would try and float up as I poured in the cement.

DIY IKEA FROSTA Lamp and Tripod Stool Combo - STEP 6 Pouring the base

DIY IKEA FROSTA Lamp and Tripod Stool Combo - STEP 6 Pouring the base

STEP 7: While you wait – the FROSTA Tripod Stool

I left the cement to dry overnight. While I was waiting I used this tutorial by Apartment Therapy to rebuild the stool, using 3 legs.

STEP A: Screw one leg

Screw one of the legs back into the seat, in a set of holes that are already there

DIY IKEA FROSTA Lamp and Tripod Stool Combo - STEP 7 Building the 3 legged stool

DIY IKEA FROSTA Lamp and Tripod Stool Combo - STEP 7 Building the 3 legged stool

DIY IKEA FROSTA Lamp and Tripod Stool Combo - STEP 7 Building the 3 legged stool

STEP B: Draw the horizontal line

Following the screw holes on opposite sides, create a line across the seat.

DIY IKEA FROSTA Lamp and Tripod Stool Combo - STEP 7 Building the 3 legged stool

STEP C: Marking the new lines

Make a mark 3 and 5/8 inches (9.2cm) down from the horizontal line along the edge on both sides of the stool. Then connect the marks with the centre hole in the stool.

DIY IKEA FROSTA Lamp and Tripod Stool Combo - STEP 7 Building the 3 legged stool

STEP D: New hole placements

Measure the distance from the edge of the stool to one of the first screw holes where the legs use to be. My measurement was 1 inch from the edge. Make this mark on your lines, this is where you’ll need to screw the first screw. Then line up the end of the leg with the line and screw the next screws in.

DIY IKEA FROSTA Lamp and Tripod Stool Combo - STEP 7 Building the 3 legged stool

DIY IKEA FROSTA Lamp and Tripod Stool Combo - STEP 7 Building the 3 legged stool

STEP 8: Removing the cardboard

I waited overnight before removing the cardboard box. Once it was removed I waited for about half a day for the sides and bottom areas to fully dry.

DIY IKEA FROSTA Lamp and Tripod Stool Combo - STEP 8 Removing the cardboard

STEP 9: Adding the Light

Next glue the LED lights to the underside of the stool leg – not too close to the curve since it will need to be connected to the power supply.

DIY IKEA FROSTA Lamp and Tripod Stool Combo - STEP 9 Adding the LED lights

DIY IKEA FROSTA Lamp and Tripod Stool Combo - STEP 9 Adding the LED lights

DIY IKEA FROSTA Lamp and Tripod Stool Combo

DIY IKEA FROSTA Lamp and Tripod Stool Combo

Email me at jacob@hometreeatlas.com with photos if you make your own, or if you have any questions.

Home Tree Atlas DIY Projects

January 30, 2016 in Made By HtA

The DIY Table Tower – Basic Edition: Plywood Shelves that Slot Onto a Table

The DIY Table Tower - Basic Edition: Plywood Shelves that Slot Onto a Table

The DIY Table Tower - Basic Edition: Plywood Shelves that Slot Onto a Table

The DIY Table Tower - Basic Edition: Plywood Shelves that Slot Onto a Table

The DIY Table Tower - Basic Edition: Plywood Shelves that Slot Onto a Table

Home Tree Atlas DIY Projects

I needed some storage space around my work table, and I couldn’t put up any shelves on the walls. So I figured out a way to build a shelf tower that could slot onto my table. It can be customized to your own storage needs. The one I built here is quite basic. But I have ideas for:

  • A Workshop Table Tower with lots of sliding shelves to store screws and side brackets to hold pliers.
  • A Desk Table Tower that will have a dowel to hang up headphones, a caddy to store notebooks, and a bracket to store pens.

The DIY Table Tower - Basic Edition: Plywood Shelves that Slot Onto a Table - Materials

TOOLS

  • Jigsaw

This is the only power saw I have, so this is what I used.

  • Drill

To cut the inside of the slot, you’ll need a drill and a drill bit the size of the jigsaw’s blade

MATERIALS AND SUPPLIES

  • Plywood

I used 3/4 inch plywood

  • Screws

1 and 1/2 inch wood screws

  • Dowels

These can be bought, but I had a few left over from an IKEA bookcase. You could also use small screws.

INSTRUCTIONS

STEP 1: The height of the tower

The tower I built is 27 inches tall, 8 inches wide (excluding the thickness of the side panels), and 9 inches deep.

So the two side panels need to be marked out: 27 inches tall and 9 inches wide. The 3 panels that fit in-between the side panels are 8 inches by 9 inches.

The DIY Table Tower - Basic Edition: Plywood Shelves that Slot Onto a Table - STEP 1 The height of the tower

STEP 2: Cut the plywood

Once the pieces are marked out, cut them all out. For the shelf panel, i just cut the piece slightly skinnier than the top and bottom ones so it can slide into the tower easier.

The DIY Table Tower - Basic Edition: Plywood Shelves that Slot Onto a Table - STEP 2 Cutting the plywood

STEP 3: Measuring the slots

The slots need to be marked out next. I drew a line across both side panels, 8 inches from the bottom.

The thickness of the table I want to put this tower on is 3/4 inch. So I would need to create a slot the same size. I measured 3/4 inches up from the 8 inch mark on both side panels. These slots need to be 7 inches wide.

The DIY Table Tower - Basic Edition: Plywood Shelves that Slot Onto a Table - STEP 3 Measuring the slots

STEP 4: Cutting the slots

Use the jigsaw to cut into the plywood where the slots are marked out. You’ll then need to use the drill to drill a hole for your jigsaw blade to fit through so you can cut the sideways part of the slot, just like in the pictures below.

The DIY Table Tower - Basic Edition: Plywood Shelves that Slot Onto a Table - STEP 4 Cutting the slots

STEP 4: Adding the dowels for the shelf

Measuring 9 inches down from the top, 2 holes (the same size as the dowels) were drilled (not all the way though) on each side panel. The dowels were then hammered in. If the holes you drilled are too wide for the dowels, just put in some glue/woodglue.

The DIY Table Tower - Basic Edition: Plywood Shelves that Slot Onto a Table - STEP 5 Adding the dowels

The DIY Table Tower - Basic Edition: Plywood Shelves that Slot Onto a Table - STEP 5 Adding the dowels

STEP 5: Assemble the Tower

Taking a side piece, drill some sink holes where your screws will go in. Now screw a side piece to either the top or bottom panel. And keep working around until you’ve built the Tower.

The DIY Table Tower - Basic Edition: Plywood Shelves that Slot Onto a Table - STEP 6 Assembling the Tower

The DIY Table Tower - Basic Edition: Plywood Shelves that Slot Onto a Table - STEP 6 Assembling the Tower

The DIY Table Tower - Basic Edition: Plywood Shelves that Slot Onto a Table - STEP 6 Assembling the Tower

The DIY Table Tower - Basic Edition: Plywood Shelves that Slot Onto a Table - STEP 6 Assembling the Tower

The DIY Table Tower - Basic Edition: Plywood Shelves that Slot Onto a Table - STEP 6 Assembling the Tower

The DIY Table Tower - Basic Edition: Plywood Shelves that Slot Onto a Table

The DIY Table Tower - Basic Edition: Plywood Shelves that Slot Onto a Table

The DIY Table Tower - Basic Edition: Plywood Shelves that Slot Onto a Table

Email me at jacob@hometreeatlas.com with photos if you make your own, or if you have any questions.

Home Tree Atlas DIY Projects

Related Posts Plugin for WordPress, Blogger...
January 29, 2016 in Made By HtA